
Was?! Diese Seite wurde nicht gefunden? Na sowas aber auch!

Ich habe gehört, das kommt auf den besten Blogs mal vor. Zum Glück bin ich ja da und passe auf. Auch wenn der Link den Du gerade geklickt hast vielleicht nicht funktioniert hat, bist Du trotzdem richtig. Denn hier findest Du selbstgenähte alternative Mode, Tipps und Tricks rund um alte Schnittmuster und viele lustige Geschichten aus dem Nähzimmer.
Die neusten Beiträge von Lasercat.fashion
- Mein Nähjahr 2024
 In diesem Beitrag möchte ich Dich mitnehmen auf eine Reise durch mein Nähjahr 2024. Ich zeige Euch meine Nähprojekte, aber auch meine größten Herausforderungen, was ich gelernt habe und was aus meinen Vorsätzen vom Vorjahr geworden ist.
 - Bolero nach „Strauß Sparschnitt“ von 1955
 Wenn es für „schulterfrei“ einfach noch etwas zu kalt ist, kommt dieses Teil zum Einsatz. Der passende Bolero aus dem selben Stoff wie das dazu passende Kleid.
 - Auf der H+H in Köln 2024
 Am Wochenende war ich in Köln auf der H+H, der größten internationalen Messe rund „Handarbeit und Hobby“. Vom 22. bis 24. März 2024 kamen in Köln die wichtigsten Köpfe der Branche zusammen, um sich über aktuelle Kollektionen, Trends und Dienstleistungen …
 - Kordelspielereien, ein neues Kleid und eine neue Lieblingsfarbe
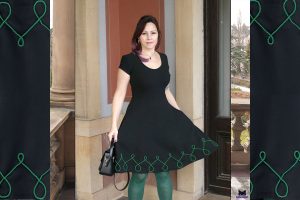 In diesem Beitrag möchte ich mit Dir mal wieder ein Kleid nähen. Dieses Kleid ist zwar selbst sehr schlicht, hat aber ein ganz besonderes Detail am Saum. Irgendwie fiel es mir schwer, diesen Beitrag zu schreiben. Ich kann nicht genau …
 - Oh, schon wieder eine Bluse!
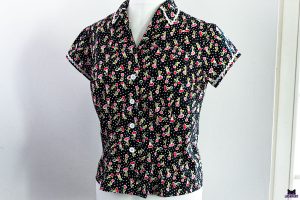 Von diesen kleidsamen Blusen im Stil der 40er/50er habe ich schon wirklich viele genäht. Und jetzt auch noch direkt zwei hintereinander! Wie und warum diese Bluse hier entstanden ist, erfahrt Ihr in diesem Beitrag.